参考
B站codewhy视频,Vuejs官方教程
什么是vue
Vue是一个渐进式的框架,渐进式意味着你可以将Vue作为你应用的一部分嵌入
其中,带来更丰富的交互体验,或者如果你希望将更多的业务逻辑使用Vue实
现,那么Vue的核心库以及其生态系统。比如Core+Vue-router+Vuex,也可
以满足你各种各样的需求
常见功能
- 解耦视图和数据
- 可复用的组件
- 前端路由
- 状态管理
- 虚拟DOM
MVVM
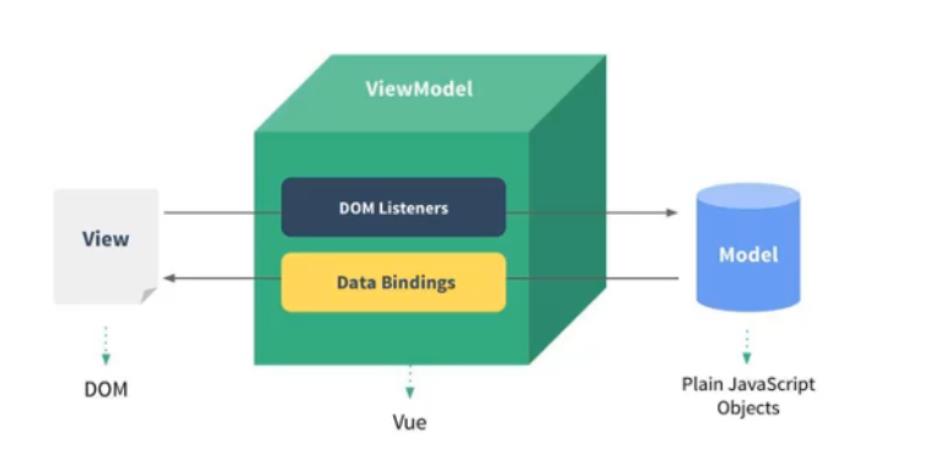
View视图层
- 在我们前端开发中,通常就是DOM层
- 主要的作用是给用户展示各种信息
Model数据层
- 数据可能是我们固定的死数据,更多的是来自我们服务器,从
网络上请求下来的数据
VueModel(视图模型层)
View 和 Model 沟通的桥梁,一方面它实现了数据绑定,将Model的
改变实时的反应到View中 另一方面它实现了DOM监听,当DOM发生一
些事件(点击、滚动、touch等)时,可以监听到,并在需要的情况下改
变对应的Data
- model 数据层都放在data里面
- view 我们的HTML页面
- view-model 控制器,将数据和视图层建立联系
vue生命周期
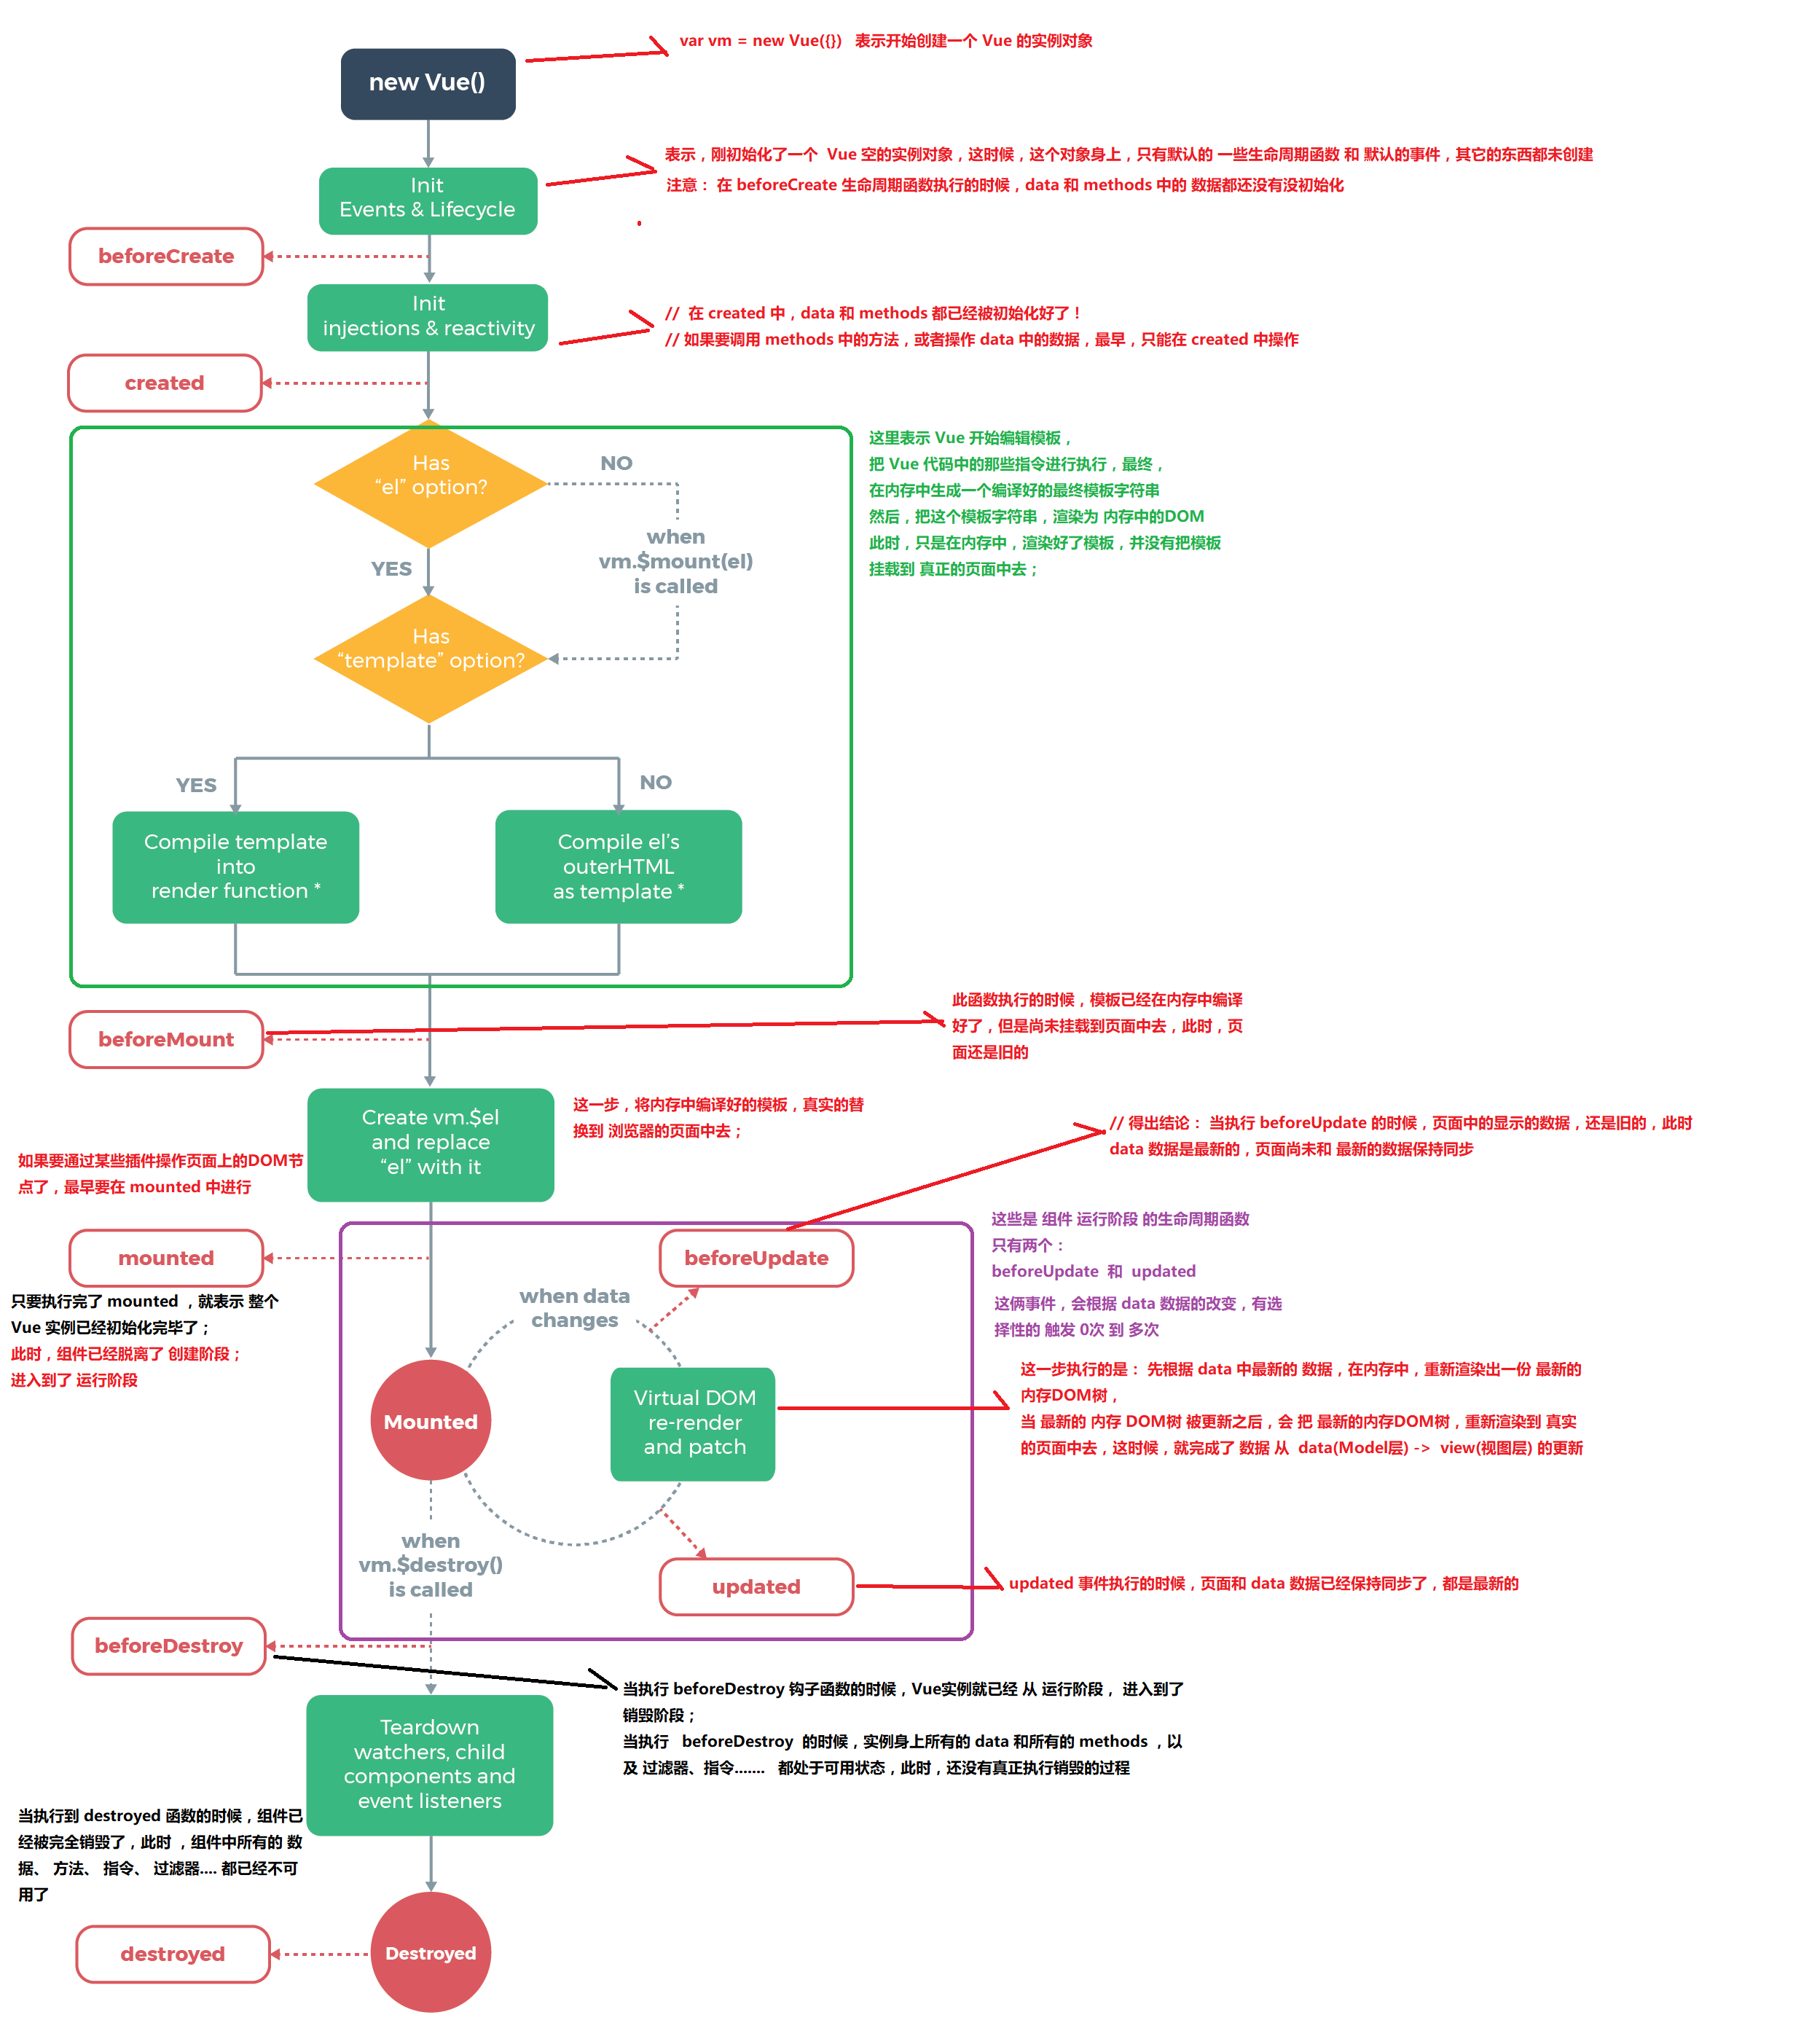
数据与方法
当一个Vue实例被创建后,它将data对象中的所有property加入到Vue的
响应式系统中,当这些peoperty值发生改变的时候视图就会产生响应,
即匹配更新为新的值
vue基础语法
Vue.js 使用了基于 HTML 的模板语法,允许开发者声明式地将 DOM 绑定至
底层 Vue 实例的数据。所有 Vue.js 的模板都是合法的 HTML,所以能被遵
循规范的浏览器和 HTML 解析器解析
Mustache
使用Mustache基本语法
1 |
|
vue属性与指令
v-once
在某些情况下,我们可能不希望界面中Mustach中的值随意的跟随改变,该指令
后面不需要跟任何表达式,该指令表示元素和组件只渲染一次,不会随着数据的
改变而改变
1 | <span v-once>这个将不会改变: {{ msg }}</span> |
v-html=”url”
某些情况下,我们从服务器请求到的数据本身就是一个HTML代码,如果我们直
接通过Mustache语法来输出,会将 HTML 代码也一起输出,但如果希望按照
HTML格式进行解析,并且显示对应的内容,可以使用v-html指令
1 | <p>Using mustaches: {{ rawHtml }}</p> |
v-text
v-text作用和Mustache比较相似,都是用于将数据显示在界面中
1 | <h2 v-text="message">这里面写的内容会被message覆盖</h2> |
v-pre
将代码原封不动的解析出来,不做任何处理
1 | <h2 v-pre>{{message}}</h2> |
methods
可以直接通过 VM 实例访问这些方法,或者在指令表达式中使用。方法中的
this自动绑定为Vue实例
v-on
绑定事件监听器,监听某个元素的点击事件在点击时发生,语法糖简写为@
- 如果该方法不需要额外参数,那么方法后的()可以不添加。但是注意:如果方
法本身中有一个参数,那么会默认将原生事件event参数传递进去 - 如果需要同时传入某个参数,同时需要event时,可以通过$event传入事件
1 | <div id="app-5"> |
事件修饰符
- .stop - 调用 event.stopPropagation() - 阻止冒泡
- .prevent - 调用 event.preventDefault() - 阻止默认事件
- .{keyCode | keyAlias} - 只当事件是从特定键触发时才触发回调
- .native - 监听组件根元素的原生事件
- .once - 点击事件只会触发一次
1 | <!-- 阻止单击事件继续传播 --> |
v-bind
Mustache 语法不能作用在 HTML attribute 上除了内容需要动态来决定外,某
些属性我们也希望动态来绑定。比如a元素的href属性,img元素的src属性,此时
Mustache语法不能用。语法糖写法为 :
1 | <div id="app-2"> |
v-bind动态绑定class
与之前的形式一样,class中也可以添加一个对象其中放入Key:Boolean
- 对象语法,也可以写在方法中
- 数组语法
1 | <div |
v-bind动态绑定style
我们可以利用v-bind:style来绑定一些CSS内联样式。在写CSS属性名的时候,
比如 font-size,可以使用驼峰式 (camelCase) fontSize,或短横线分
隔 (kebab-case,记得用单引号括起来) ‘font-size’
- 对象语法
- 数组语法
1 | <h2 :style="{fontSize:'50px'}">{{message}}</h2> |
computed
在模板中可以直接通过插值语法显示一些 data 中的数据,但是在某些情况下
,可能需要对数据进行一些转化后再显示,或者需要将多个数据结合起来进行
显示,这时可以使用计算属性computed
1 | <h2>{{getFullName()}}</h2> |
computed与methods的区别
- computed是属性调用,而methods是函数调用
- computed带有缓存功能,而methods不是
- computed定义的方法我们是以属性访问的形式调用的
- methods定义的方法,我们必须要加上()来调用
- 我们可以将同一函数定义为一个方法而不是一个计算属性。两种方式的最终
结果确实是完全相同的。然而不同的是计算属性是基于它们的响应式依赖进行
缓存的。只在相关响应式依赖发生改变时它们才会重新求值。这就意味着只要
text还没有发生改变,多次访问 getText 计算属性会立即返回之前的计算
结果,而不必再次执行函数。而方法只要页面中的属性发生改变就会重新执行 - 对于任何复杂逻辑,你都应当使用计算属性
- computed依赖于data中的数据,只有在它的相关依赖数据发生改变时才
会重新求值
条件判断
v-if、v-else-if、v-else 这三个指令与 JavaScript 的条件语句 if、else
、else if 类似vue 的条件指令可以根据表达式的值在 DOM 中渲染或销毁元
素或组件,一般写在computed中
1 | <div id="app-3"> |
key
Vue 会尽可能高效地渲染元素,通常会复用已有元素而不是从头开始渲染。这么
做除了使 Vue 变得非常快之外,还有其它一些好处。例如,如果你允许用户在
不同的登录方式之间切换
1 | <template v-if="loginType === 'username'"> |
那么在上面的代码中切换loginType将不会清除用户已经输入的内容。因为两个
模板使用了相同的元素,input不会被替换掉——仅仅是替换了它的placeholder
这样也不总是符合实际需求,所以Vue为你提供了一种方式来表达“这两个元素
是完全独立的,不要复用它们”。只需添加一个具有唯一值的key attribute即可
1 | <template v-if="loginType === 'username'"> |
指令v-for
当我们有一组数据需要进行渲染时,我们就可以使用v-for来完成
- v-for=”item in items”
- v-for=”(item, index) in items”
- v-for=”(item, key, index) in items”
1 | <ul id="example-1"> |
v-model
表单输入和应用状态之间的双向绑定。改变text的内容,message也会改变。
限制在input、select、textarea、components中使用,input标签默认会有
input方法监听输入信息
1 | <input type="text" v-model="message"> |
v-model其实是一个语法糖,它的背后本质上是包含两个操作
- v-bind绑定一个value属性
- v-on指令给当前元素绑定input事件
1 | <div id="app-6"> |
相当于
1 | <input type="text" :value="message" @input="message = $event.target.value"> |
结合radio
1 | <div class="app"> |
label for
如果在label 元素内点击文本,就会触发此控件
1 | <label for="SSN">Social Security Number:</label> |
checkbox
- 单个勾选框
- v-model即为布尔值。
- 此时input的value并不影响v-model的值多选框
1
2
3
4
5
6
7
8
9
10
11
12
13
14
15
16
17<div class="app">
<!-- checkbox单选框 -->
<label for="licence">
<input type="checkbox" v-model="isAgree" id="licence">同意协议
</label>
<h3>您的选择是:{{isAgree}}</h3>
<button :disabled="!isAgree">下一步</button>
</div>
<script src="../js/vue.js"></script>
<script>
const app = new Vue({
el: '#app',
data: {
isAgree: false
}
});
</script> - 当是多个复选框时,因为可以选中多个,所以对应的data中属性是一个数组。
- 当选中某一个时,就会将input的value添加到数组中。
1
2
3
4
5
6
7
8
9
10
11
12
13
14
15
16
17
18
19
20
21
22
23
24
25<div class="app">
<h3>请选择您的爱好</h3>
<label for="sing">
<input type="checkbox" v-model="hobbies" id="sing" value="唱">唱
</label>
<label for="jump">
<input type="checkbox" v-model="hobbies" id="jump" value="跳">跳
</label>
<label for="rap">
<input type="checkbox" v-model="hobbies" id="rap" value="rap">rap
</label>
<label for="basketball">
<input type="checkbox" v-model="hobbies" id="basketball" value="篮球">篮球
</label>
<h3>您的爱好是:{{hobbies}}</h3>
</div>
<script src="../js/vue.js"></script>
<script>
const app = new Vue({
el: '.app',
data: {
hobbies: []
}
});
</script>
select
单选:只能选中一个值。
- v-model绑定的是一个值。
- 当我们选中option中的一个时,会将它对应的value赋值到mySelect中
多选:可以选多个值 - v-model绑定的是一个数组。
- 当选中多个值时,就会将选中的option对应的value添加到数组mySelects中
1
2
3
4
5
6
7
8
9
10
11
12
13
14
15
16
17
18
19
20
21
22
23
24
25
26
27
28
29
30
31
32<div class="app">
<!-- 选择一个值 -->
<h3>请选择您喜欢的水果:</h3>
<select name="" v-model="fruit">
<option value="苹果">苹果</option>
<option value="香蕉">香蕉</option>
<option value="橘子">橘子</option>
<option value="西瓜">西瓜</option>
<option value="榴莲">榴莲</option>
</select>
<h3>您选择的水果是:{{fruit}}</h3>
<!-- 选择多个值 -->
<select name="" v-model="fruits" multiple>
<option value="苹果">苹果</option>
<option value="香蕉">香蕉</option>
<option value="橘子">橘子</option>
<option value="西瓜">西瓜</option>
<option value="榴莲">榴莲</option>
</select>
<h3>您选择的水果是:{{fruits}}</h3>
</div>
<script src="../js/vue.js"></script>
<script>
const app = new Vue({
el: '.app',
data: {
fruit: '苹果',
fruits: []
}
});
</script>
表单修饰符
- number 转换为数值
- 当开始输入非数字的字符串时,因为Vue无法将字符串转换成数值
- 所以属性值将实时更新成相同的字符串。即使后面输入数字,也将被视作字符串
- trim 自动过滤用户输入的首尾空白字符
- 只能去掉首尾的 不能去除中间的空格
- lazy 将input事件切换成change事件
- .lazy 修饰符延迟了同步更新属性值的时机。即将原本绑定在 input 事件的同
步逻辑转变为绑定在 change 事件上 - 在失去焦点或者按下回车键时才更新
1
2
3
4
5
6
7
8
9
10
11
12
13
14
15
16
17
18
19
20
21<div class="app">
<!-- 1.lazy修饰符:失去焦点或按下回车才更新 -->
<input type="text" v-model.lazy="name">
<h2>{{name}}</h2>
<!-- 2.number修饰符:将输入框中的内容自动转为number -->
<input type="number" v-model.number="age">
<h2>{{age}}---{{typeof age}}</h2>
<!-- 3.trim修饰符:过滤内容左右两边的空格 -->
<input type="text" v-model.trim="name">
<h2>你输入的名字是:{{name}}</h2>
</div>
<script src="../js/vue.js"></script>
<script>
const app = new Vue({
el: '.app',
data: {
name: 'gaoming',
age: 18,
}
});
</script>
Vue组件开发
认识组件化
如果将一个复杂的问题,拆分成很多个可以处理的小问题,再将其放在整体
当中,你会发现大的问题也会迎刃而解。组件化也是类似的思想如果我们将
一个页面中所有的处理逻辑全部放在一起,处理起来就会变得非常复杂,
而且不利于后续的管理以及扩展。但如果,我们讲一个页面拆分成一个
个小的功能块,每个功能块完成属于自己这部分独立的功能,那么之后
整个页面的管理和维护就变得非常容易了。
vue组件化思想
组件化是Vue.js中的重要思想它提供了一种抽象,让我们可以开发出一个个
独立可复用的小组件来构造我们的应用。任何的应用都会被抽象成一颗组件树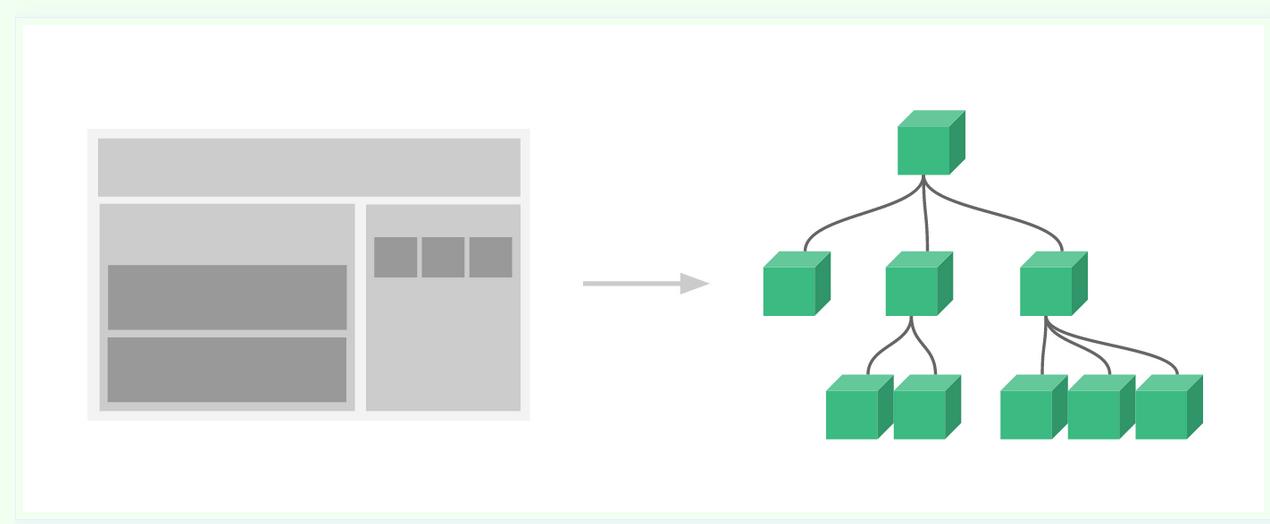
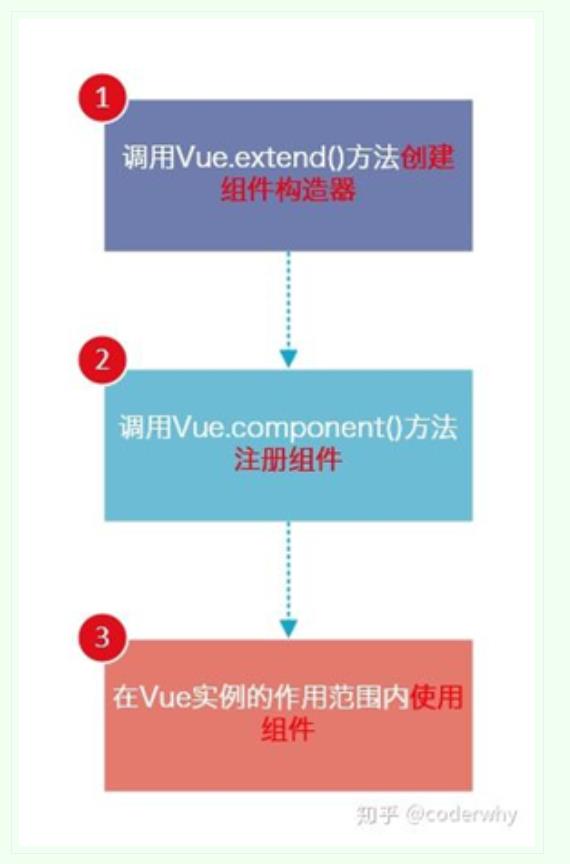
注册组件
- 创建组件构造器 Vue.extend
- 注册组件 Vue.component
- 使用组件 挂载在某个vue实例下
1 | <div id="example"> |
全局组件和局部组件
全局组件可以在多个vue实例下使用,局部组件挂载在某个vue中在指定vue实例中使用
1 | const a=new Vue( |
父组件和子组件
组件和组件之间存在层级关系,而其中一种非常重要的关系就是父子组件的
关系cpn2是父组件,cpn是子组件,cpn不能再vue实例中单独使用如果要使
用必须也注册在vue实例中
1 | const cpn2 = Vue.extend({ |
注册组件语法糖
- 注册全局组件语法糖 Vue.component(‘cpnc1’,{template: })
- 注册局部组件语法糖 components: {‘cpnc1’: {template: } }
组件模板抽离写法
即使用script标签或template标签将模板内容从注册时的template中抽离出来
1 | <template id="cpn"> |
组件数据存放问题
组件是一个单独功能模块的封装:这个模块有属于自己的HTML模板,也应该
有属性自己的数据data,组件不能直接访问vue实例中的数据,此data属性
不是对象类型而是一个函数,返回一个实例对象保存数据data是一个函数,
因此组件可以实现复用多个组件数据相互之间不会影响因为返回的是不同的
数据对象
1 | const cpn = Vue.extend({ |
父子组件的通信
子组件不能引用父组件或者vue实例的数据,父组件发送网络请求,收到数据再将
其传递至子组件并进一步操作
父传子 props
- 字符串数组,数组中的字符串就是传递的名称
- 对象,对象可以设置传递时的类型,也可以设置默认值,如果以对象传递可以
指定类型 String Number Boolean Array Object Date
Function Symbol如果类型是数组或者对象默认值必须是一个函数 default()
{return []|{}} - 子组件需要通过v-bind绑定指定数据给自己,同时在组件中通过props
(properties-属性)接收相应数据1
2
3
4
5
6
7
8
9
10
11
12
13
14
15
16
17
18
19
20
21
22
23
24
25
26
27
28
29
30
31
32
33
34
35
36
37
38
39
40
41
42
43
44
45
46
47
48
49
50
51
52
53
54
55
56
57<div id="app">
<!--<cpn v-bind:cmovies="movies"></cpn>-->
<!--<cpn cmovies="movies" cmessage="message"></cpn>-->
// 不使用v-bind则不会将其识别为变量而是直接将其当作字符串传过去
<cpn :cmessage="message" :cmovies="movies"></cpn>
</div>
<!-- 定义 cpn 组件模板 -->
<template id="cpn">
<div>
<ul>
<li v-for="item in cmovies">{{ item }}</li>
</ul>
<h2>{{ cmessage }}</h2>
</div>
</template>
// 定义 cpn 组件
const cpn = {
template: '#cpn',
// 可以是一个数组
// props: ['cmovies', 'cmessage'],
// 也可以通过对象设置传入以及设置更多默认参数
props: {
// 1.类型限制
// cmovies: Array,
// cmessage: String,
// 2.提供一些默认值, 以及必传值
cmessage: {
type: String,
default: 'aaaaaaaa',
required: true
},
// 类型是对象或者数组时, 默认值必须是一个函数
cmovies: {
type: Array,
default() {
return []
}
}
},
data() {
return { }
},
methods: { }
}
const app = new Vue({
el: '#app',
data: {
message: 'hello tadm',
movies: ['海王', '海贼王', '海尔兄弟']
},
// 注册 cpn 组件
components: {
// 'cpn': cpn
// ES6 增强写法
cpn
}
})
子传父
子组件需要向父组件传递数据是就要用到自定义事件v-on不仅可以用于监听
DOM事件也可以监听组件的自定义事件子组件中通过$emit()来触发事件父
组件中通过v-on来监听子组件事件子组件通过$emit()来发射事件以及参
数,在父组件中通过@(v-on)来监听传过来的事件并进行相应处理(比如发
送网络请求)流程:首先监听子组件的btn方法,当点击按钮时触发,在
btn方法中向父组件传递事件itemclick,父组件监听此事件
1 | <!--父组件模板--> |
1 | const cpn = { |
父子组件双向绑定
v-model原型利用(v-bind,v-on)
1 | <div id="app"> |
1 | const app = new Vue({ |
使用v-model
1 | <div id="app"> |
1 | const app = new Vue({ |
父子组件直接访问
父访问子使用 $refs。通过ref给某个子组件绑定一个特定的ID,然后就可以
通过this.$ref.ID访问到这个组件
1 | <div id="app"> |
1 | const app = new Vue({ |
插槽slot(vue2.6之前)
组件的插槽 使封装的组件更加具有扩展性,让使用者决定组件的内部的一些内
容展示什么抽取共性到组件中,预留不同的插槽slot中可以有默认值,如果不
向cpn中输入内容就用默认值,如果多个值同时放入一个slot中都是替换值默认
插槽
1 | <div id="app"> |
1 | const app = new Vue({ |
具名插槽,slot标签中加入name属性,在cpn中如果需要加入内容就需要
slot=name来绑定对应的slot,如果不绑定name则不会改变
1 | <div id="app"> |
模块化开发
在网页开发的早期,js作为一种脚本语言,做一些简单的表单验证或动画实现等,
那个时候代码很少,直接将代码写在script标签中即可随着ajax异步请求的出
现,慢慢形成了前后端的分离,客户端需要完成的事情越来越多,代码量也是
与日俱增。为了应对代码量的剧增,我们通常会将代码组织在多个js文件中,
进行维护。但是这种维护方式,依然不能避免一些灾难性的问题,比如全局
变量同名问题。模块化可以解决变量重名,导入JS顺序问题以及提高复用性
1 | // a.js |
commonjs
export
1 | // a.js |
import
1 | let {...} = require('./a.js') |
html设置
1 | <script type="module" src="./a.js"></script> |
es6
export
1 | // a.js |
export default
export default在同一个模块中,不允许同时存在多个(唯一性,防止导入混乱)
1 | // b.js |
import
1 | // import from export |
webpack
从本质上来讲,webpack是一个现代的JavaScript应用的静态模块打包工具
vue-cli
如果你只是简单写几个Vue的Demo程序, 那么你不需要 Vue CLI,如果你在
开发大型项目, 那么你需要, 并且必然需要使用Vue CLI,使用 Vue.js开
发大型应用时,我们需要考虑代码目录结构、项目结构和部署、热加载、代码
单元测试等事情,如果每个项目都要手动完成这些工作,效率比较低,所以
通常我们会使用一些脚手架工具来帮助完成这些事情
runtime-only和runtime-compile
- 如果在之后的开发中,依然使用template,就需要选择Runtime-Compiler
- 如果你之后的开发中,使用的是.vue文件开发,那么可以选择Runtime-only
1
2
3
4
5
6
7
8
9
10
11
12
13
14
15
16// main.js
import Vue from 'vue'
import App from './App'
// runtime-compiler
new Vue({
el: '#app',
template: '<App/>',
components: { App }
})
// runtime-only
new Vue({
el: '#app',
render: function (h) {
return h(App)
}
})
render函数的使用
1 | import Vue from 'vue' |
创建项目
- vue create name 创建项目
- Manually select features
- 选择babel router
- 单独选择生成配置文件
- 目前npm run serve是运行命令
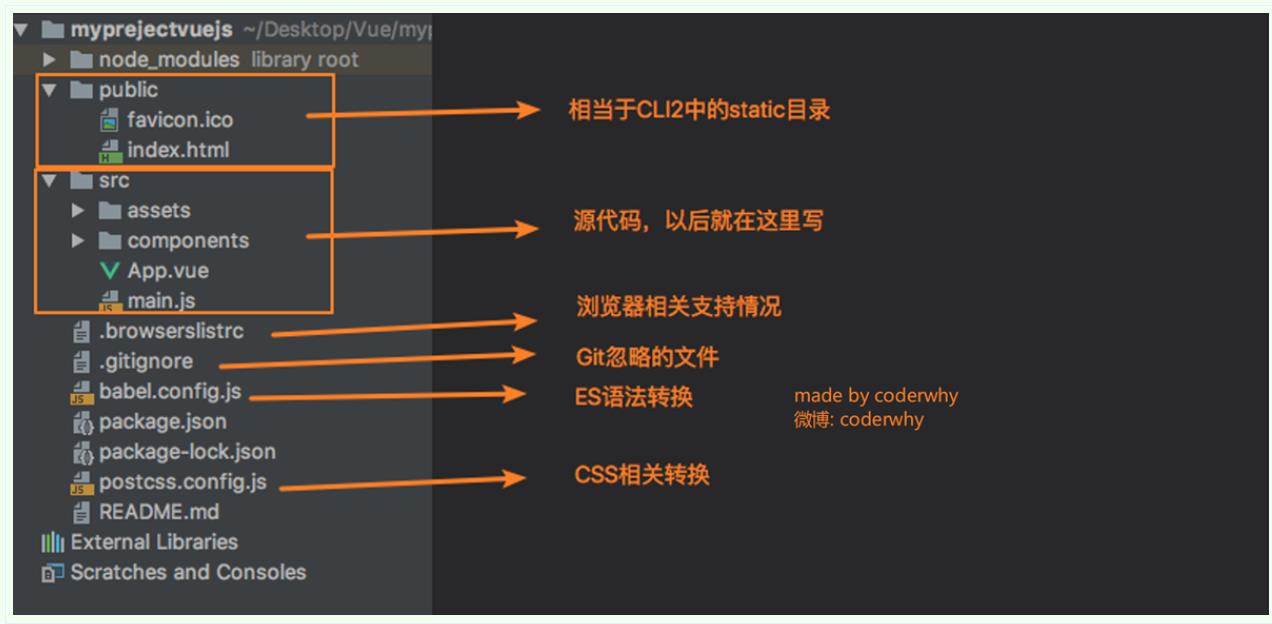
箭头函数
1 | // 1.1.无参 |
this
1 | setTimeout(function () { |
vue-router
路由就是通过互联的网络把信息从源地址传输到目的地址的活动,后端
渲染:jsp php,后端路由:后端处理url和页面之间的映射关系缺点
:整个页面都是由后端开发,html和Java代码混杂在一起随着Ajax出
现,前后端分离前端渲染:浏览器中显示的网页中的大部分内容都是
由前端写的js代码在浏览器中执行最终渲染出来的网页前端路由
单页面应用
整个网页只有一个html页面,静态资源服务器中可能只有一个html文件
一个css文件,一个javascript文件,url和页面组件的映射关系是由
前端路由管理url发生改变时会抽取相应的组件,整个页面并没有刷新
在用户与应用程序交互时动态更新该页面的Web应用程序,不过首次加
载页面时需要加载大量的静态资源
多页面应用
一个应用有多个页面,页面跳转是整页刷新
Hash
URL的hash也就是锚点(#), 本质上是改变window.location的href属
性.(href—hyper reference)我们可以通过直接赋值location.hash
来改变href, 但是页面不发生刷新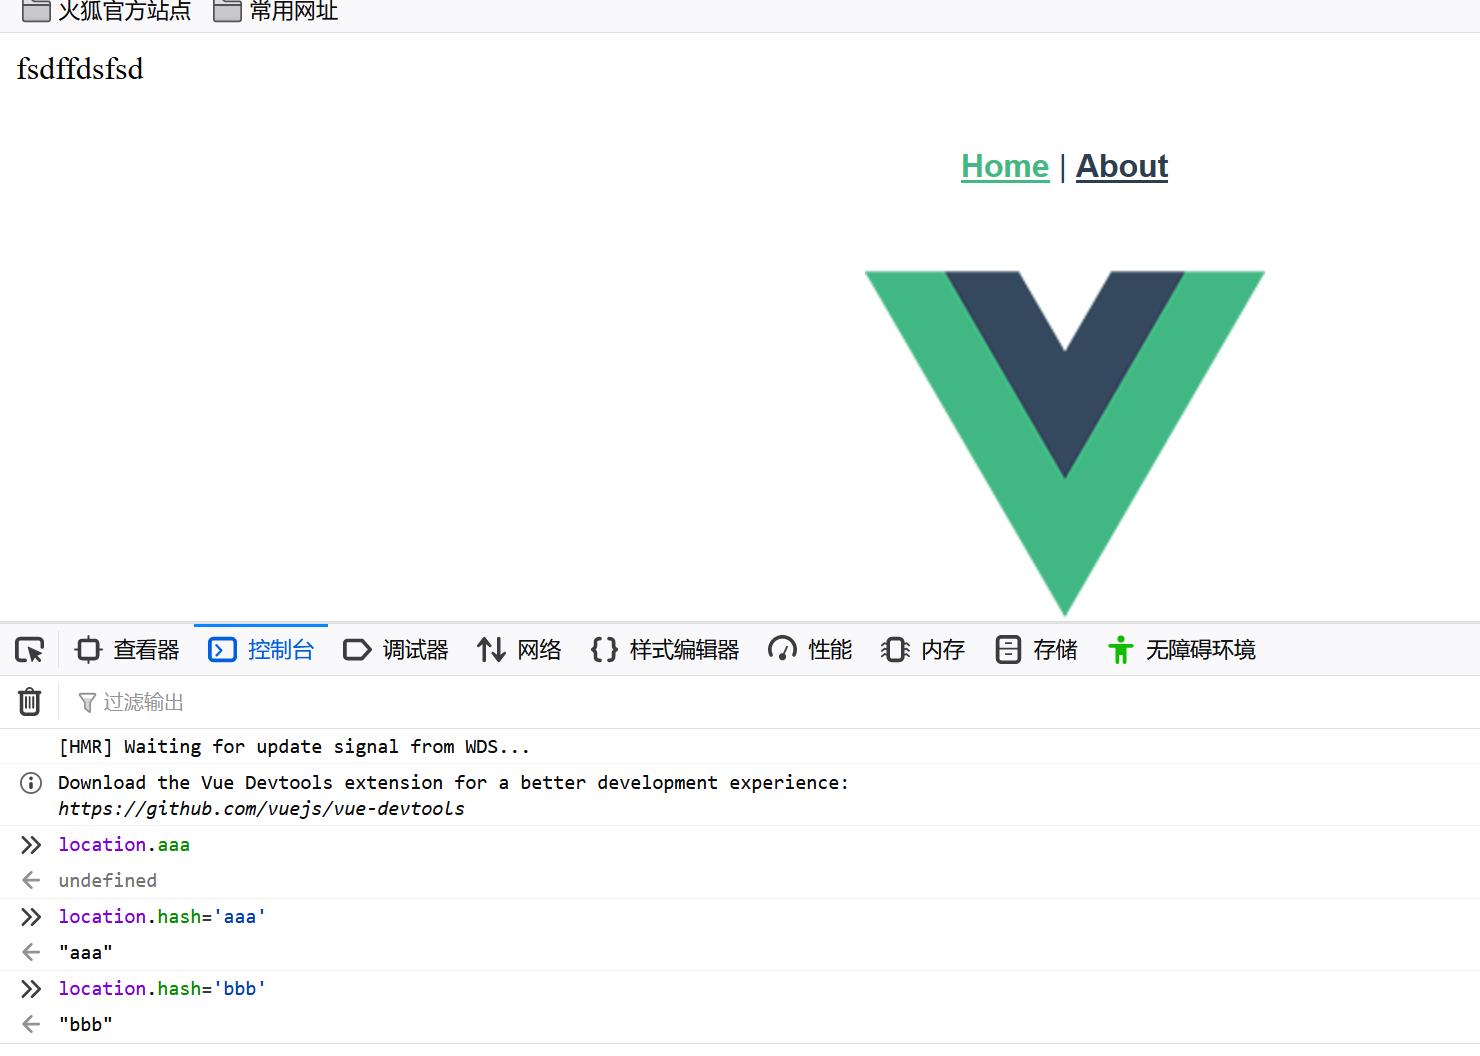
History
- history.pushState()—(一个状态对象, 一个标题 (目前被忽略),
和 (可选的) 一个URL) - history.replaceState({},’’,’aaa’) 不是栈结构
- history.go()—(无参—refresh or 0 or 1 or -1)
- history.back() 等价于 history.go(-1)
- history.forward() 则等价于 history.go(1)
路由使用
- 创建路由组件 对应一个路径。组件都是.vue的形式
- 第二步: 配置路由映射: 组件和路径映射关系
- 第三步: 使用路由: 通过router-link和router-view
vue-router在该路径下配置路由信息 src/router/index.js
1 | import Vue from 'vue' |
组件
Home组件
1 | <template> |
App.vue组件 src/App.vue 该组件挂载在main.js中的vue上
router-view 将挂载的组件进行渲染 router-link 会被渲染成a标签
1 | <template> |
路由默认值和修改为history模式
可以配置路由默认值,在router/index.js中加入一个映射
1 | { |
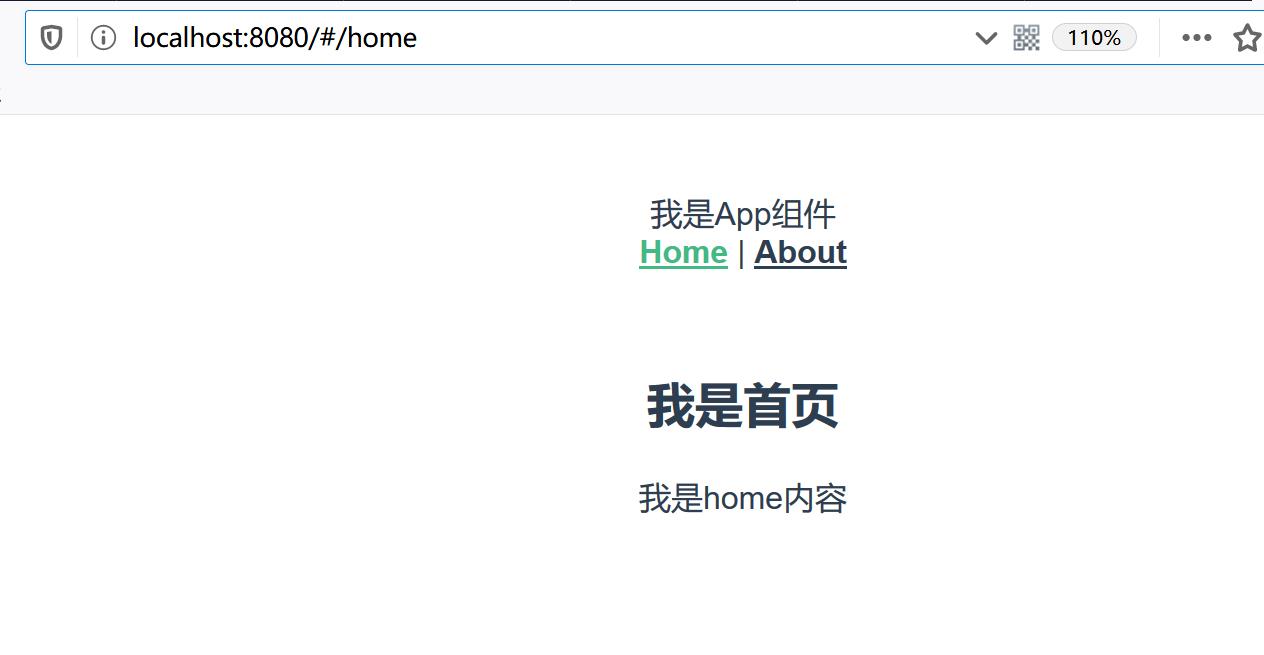
默认使用hash模式,但是上图有#号不好看,可以改为history,在
router/index.js文件中
1 | const router = new VueRouter({ |
router-link的其它属性
之前只讲了一个属性to,用于指定跳转的路径。
- tag 默认渲染成a标签,也可以渲染成其它标签
1
<router-link to="/home" tag="button">Home</router-link> |
- replace 默认使用pushState来回跳转,可以指定为replaceState
1
<router-link to="/about" replace>About</router-link>
- router-link-active 被点击的组件处于活跃状态会增加一个class
1
2
3
4
5<style>
.router-link-active{
color: #ff0000;
}
</style>
router和route
route
$route表示当前的路由信息,包含了当前URL解析得到的信息。包含当前的路
径,参数,query对象等
- $route.path 字符串,对应当前路由的路径,总是解析为绝对路径,如
“/foo/bar” - $route.params 一个key/value对象,包含了动态片段和全匹配片段
- $route.query 一个key/value对象,表示URL查询参数。例如对于路径
/foo?user=1,则有$route.query.user==1
router
$router是全局路由的实例
- $router.push push方法的跳转会向history栈添加一个新的记录,当我
们点击浏览器的返回按钮时可以看到之前的页面 - $router.go 页面路由跳转前进或者后退,比如$router.go(-1)表示后退
- replace 替换当前的页面,不会向history栈添加一个新的记录
通过代码跳转路由
1 | <template> |
封装后
1 | <template> |
vue-router动态路由的使用
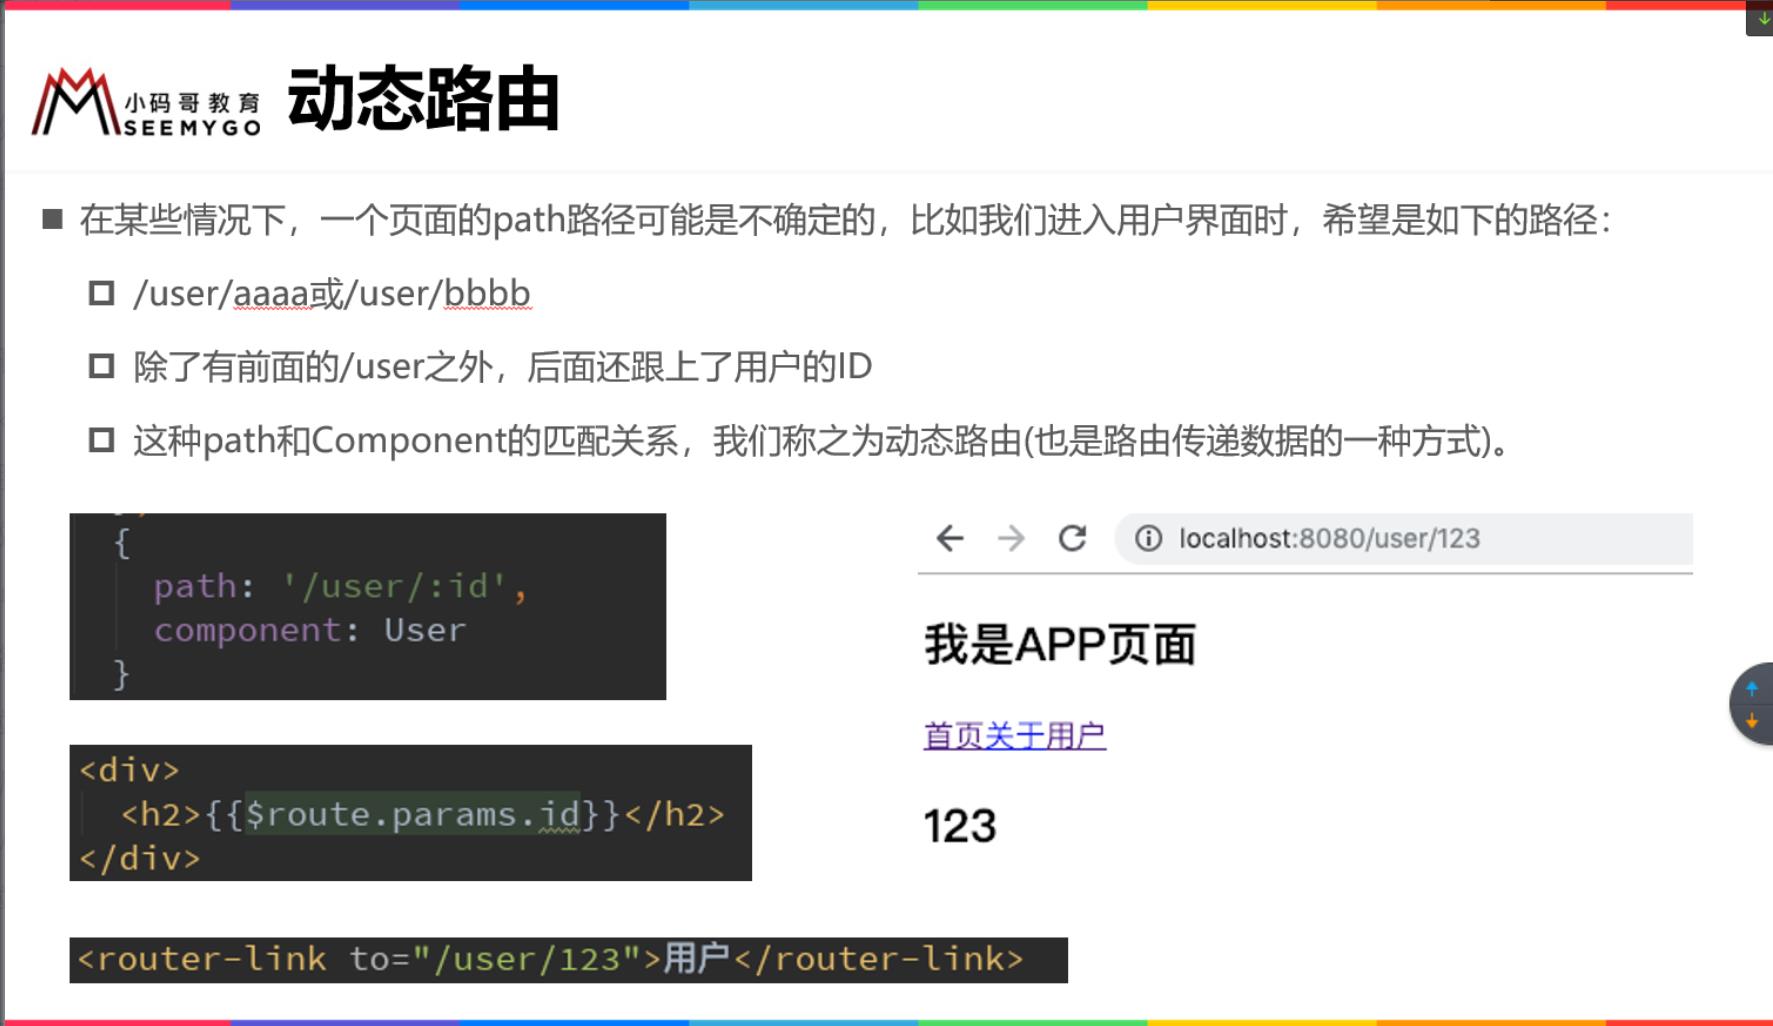
1 | { |
1 | //App.vue中添加 |
创建User组件
1 | <template> |
路由懒加载
当打包构建应用时,Javascript 包会变得非常大,影响页面加载,如果我们
能把不同路由对应的组件分割成不同的代码块,然后当路由被访问的时候才加
载对应组件,这样就更加高效了,为了实现这种效果,我们可以使用路由的懒
加载 路由懒加载的主要作用就是将路由对应的组件打包成一个个的 js 代
码块,只有在这个路由被访问到的时候,才加载对应的组件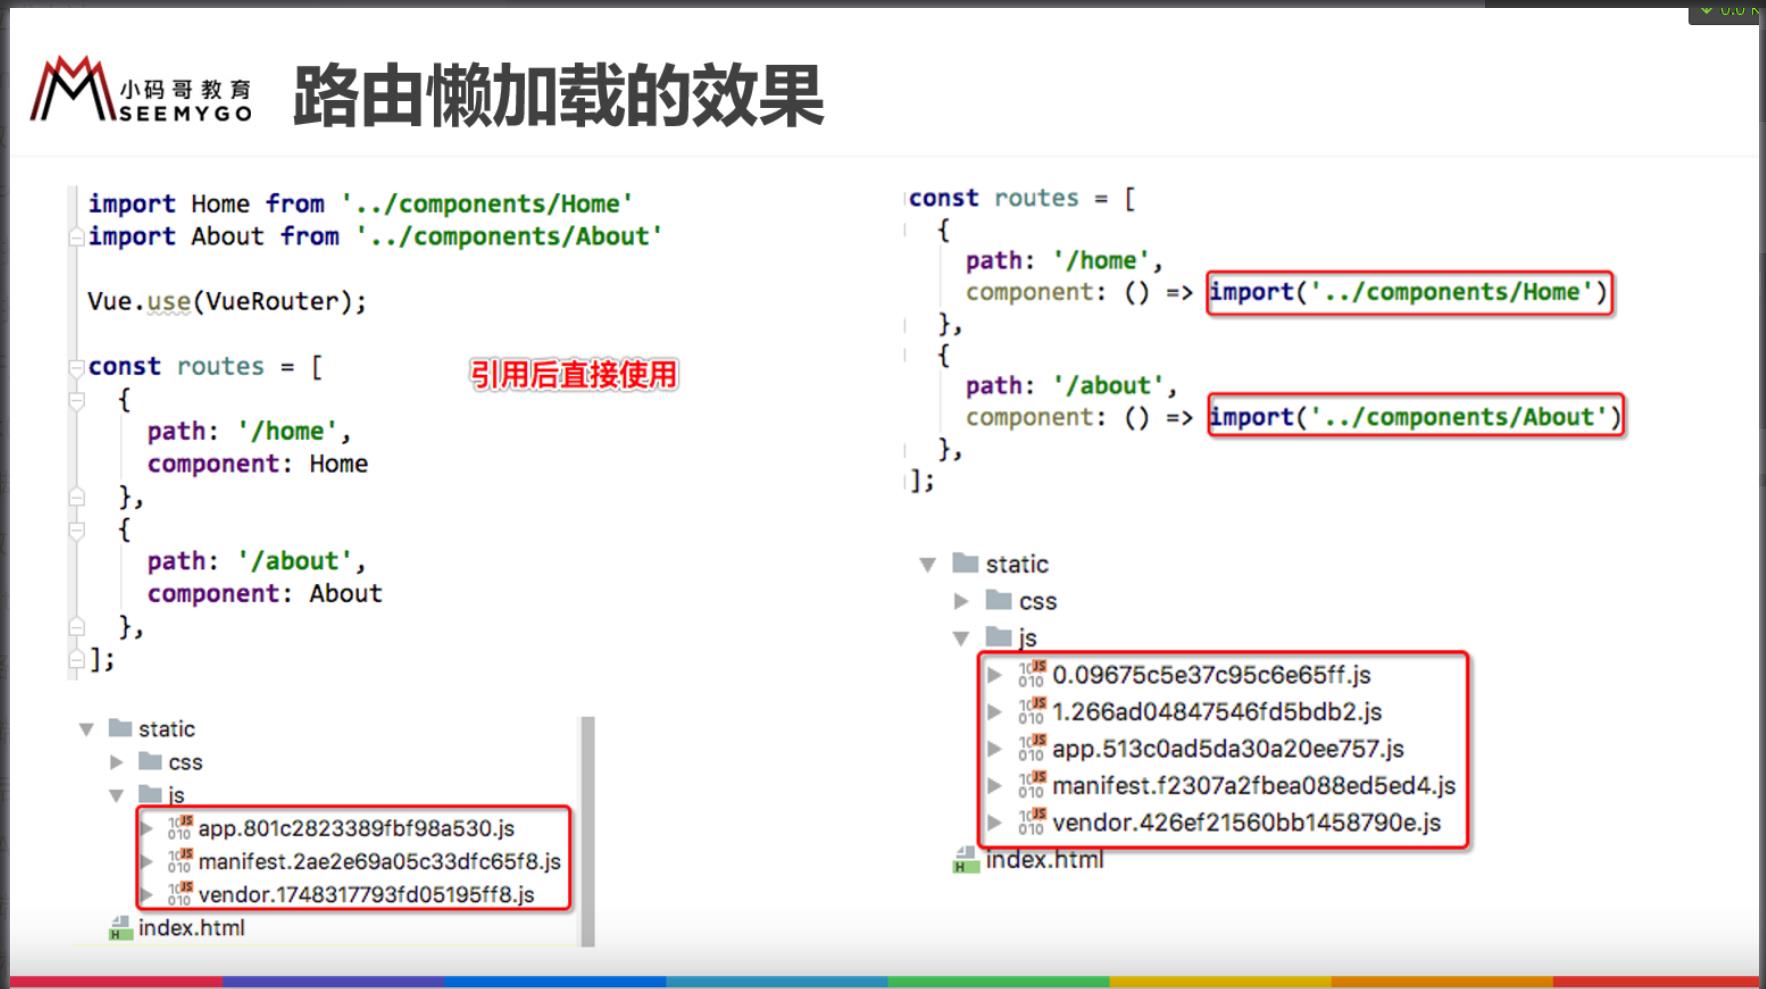
1 | const Home=()=>import('../components/Home.vue') |
嵌套路由
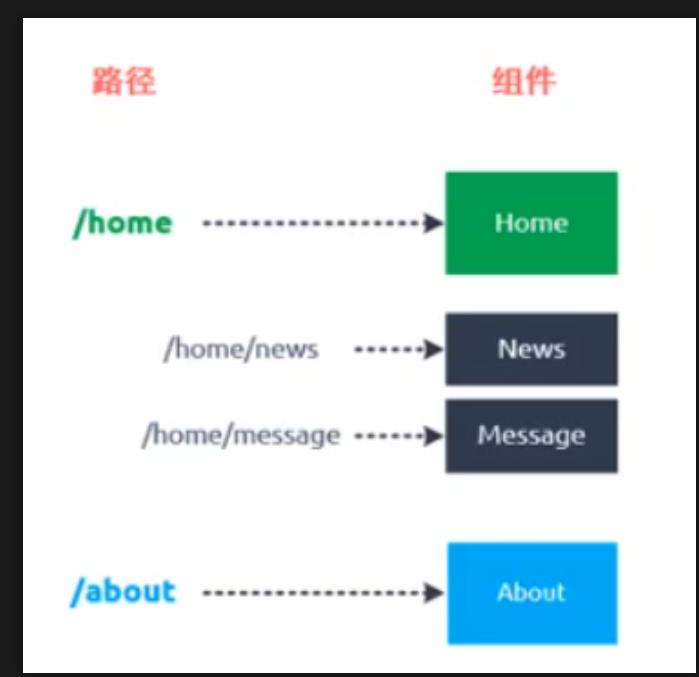
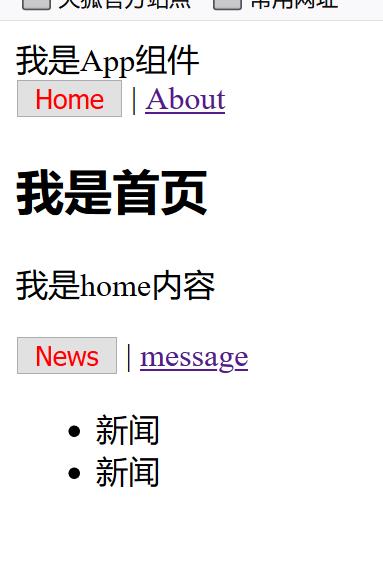
- 创建对应的子组件, 并且在路由映射中配置对应的子路由
- 在组件内部使用< router-view>标签
在router/index.js文件中
1 | { |
在Home.vue中
1 | <template> |
vue-router 参数传递
创建一个Profile.vue,并且按照之前方式跟Home和About一样配置
1 | <template> |
- params
配置路由格式:/router/:id
传递的方式:在 path 后面跟上对应的值
传递后形成的路径:/router/123,/router/abc - query
配置路由格式:/router
传递的方式:对象中使用 query 的 key 作为传递方式
传递后形成的路径:/router?id=123,/router?id=abc
router-link
1 | <template> |

不使用router-link
1 | <button @click=toProfile>profile</button> |
$router和$route
- $router为VueRouter实例,想要导航到不同URL,则使用$router.push方法
- $route为当前router跳转对象里面可以获取name、path、query、params等
vue-router 全局导航守卫
对来回跳转的过程进行监听,可以在监听函数中进行相应操作,我们来考虑一
个需求: 在一个SPA应用中, 如何改变网页的标题呢?网页标题是通过普通的
修改方式:我们比较容易想到的修改标题的位置是每一个路由对应的组件.vue
文件中.通过mounted声明周期函数, 执行对应的代码进行修改即可。但是当
页面比较多时, 这种方式不容易维护(因为需要在多个页面执行类似的代码)
有没有更好的办法呢? 使用导航守卫即可。什么是导航守卫?
- vue-router提供的导航守卫主要用来监听监听路由的进入和离开的.
- vue-router提供了beforeEach和afterEach的钩子函数, 它们会在路由即
将改变前和改变后触发.
生命周期函数
- create vue创建时调用该函数
- mounted template被挂载到DOM时
- update 界面发生更新时
使用导航守卫
在router/index.js文件中
- to: 即将要进入的目标的路由对象
- from: 当前导航即将要离开的路由对象
- next: 调用该方法后, 才能进入下一个钩子
- 如果是后置钩子,也就是afterEach,不需要主动调用 next() 函数
- 上面使用的导航守卫,被称之为全局守卫,除此之外,还有路由独享的守
卫、组件内的守卫1
2
3
4
5
6
7
8
9
10
11
12
13
14
15
16
17
18
19{
path: '/home',
..
meta: {
title: 'home'
}
},
..
// 前置守卫(guard)
router.beforeEach((to, from, next) => {
// 从from跳转到to
document.title = to.matched[0].meta.title
// console.log(to);
next()
})
// 后置钩子(hook)
router.afterEach((to, from) => {
// console.log('----');
})
mounted
html加载完成后执行。执行顺序是子组件-父组件
keep-alive
keep-alive 是 Vue 内置的一个组件,可以使被包含的组件保留状态,
或避免重新渲染。它们有两个非常重要的属性:
include - 字符串或正则表达,只有匹配的组件会被缓存
exclude - 字符串或正则表达式,任何匹配的组件都不会被缓存
router-view 也是一个组件,如果直接被包在
keep-alive 里面,所有路径匹配到的视图组件都会被缓存
1 | <keep-alive> |
在Home.vue中
1 | /*下面两个函数(activated/deactivated), 只有该组件被保持了状态使用了keep-alive时, 才是有效的*/ |
不被缓存,这个时候就需要用到vue文件中的name,exclude中的就是组件的name
1 | <keep-alive exclude="Profile,User"> |
TabBar
- 在asserts文件夹中可以创建img和css两个子文件夹,img中又可以有多个文件夹更加清晰
在css文件夹中创建base.css文件,然后再APP.vue中动态引用css文件,这样代码更加清晰明了
以后不需要在vue中写css代码只需要动态引用即可1
2
3
4body {
padding: 0;
margin: 0;
}1
2
3
4
5
6<style>
@import "./assets/css/base.css";
.router-link-active{
color: #ff0000;
}
</style> - 在components中创建tabbar文件夹,创建tabbar组件,可以实现复用
在APP.vue中引用tabbar1
2
3
4
5
6
7
8
9<script>
import Tabbar from './components/tabber/Tabbar.vue'
export default {
name: 'App',
components: {
Tabbar
}
}
</script>再创建一个Tabb组件,放插槽中的内容,在APP.vue中引用这个组件1
2
3
4
5
6
7
8
9
10
11<template>
<div>
<slot>
<div class="guimie">
<img src="../../assets/img/tabber/guimie.jpg">
首页
</div>
<div>分类</div>
</slot>
</div>
</template>1
2
3
4
5
6
7
8
9
10
11
12
13
14
15
16
17
18<template>
<div id="app">
<Tabbar>
<Tabb></Tabb>
</Tabbar>
</div>
</template>
<script>
import Tabbar from './components/tabber/Tabbar.vue'
import Tabb from './components/tabber/Tabb.vue'
export default {
name: 'App',
components: {
Tabbar,
Tabb
}
}
</script>
Promise
Promise是异步编程的一种解决方案
一种很常见的场景应该就是网络请求了。
我们封装一个网络请求的函数,因为不能立即拿到结果,所以不能像简单的3+4=7一样将
结果返回,同步一旦发生阻塞需要等待,异步操作不需要等待返回继续与用户进行交互,当
网络请求的数据回来的时候定义一个回调的函数拿到请求数据
所以往往我们会传入另外一个函数,在数据请求成功时,将数据通过传入的函数回调出去。
如果只是一个简单的网络请求,那么这种方案不会给我们带来很大的麻烦。
但是,当网络请求非常复杂时,就会出现回调地狱。
- Promise 是一个构造函数,既然是构造函数,那么,我们就可以 new Promise()
得到一个Promise 的实例; - 在 Promise 上,有两个函数,分别叫做 resolve(成功之后的回调函数)和 reject
(失败之后的回调函数) - 在 Promise 构造函数的 Prototype 属性上,有一个 .then() 方法,
也就说,只要是Promise 构造函数创建的实例,都可以访问到 .then() 方法 - Promise 表示一个 异步操作;每当我们 new 一个 Promise 的实例,
这个实例,就表示一个具体的异步操作; - 既然 Promise 创建的实例,是一个异步操作,那么,这个 异步操作的结果
只能有两种状态: 5.1 状态1: 异步执行成功了,需要在内部调用 成功的回调函数
resolve 把结果返回给调用者 状态2: 异步执行失败了,需要在内部调用 失败的回
调函数reject把结果返回给调用者
由于 Promise 的实例,是一个异步操作,所以,内部拿到 操作的结果后,无法使用
return 把操作的结果返回给调用者; 这时候,只能使用回调函数的形式,来把
成功 或 失败的结果,返回给调用者 - 我们可以在 new 出来的 Promise 实例上,调用 .then() 方法,【预先】 为
这个 Promise 异步操作,指定 成功(resolve) 和 失败(reject) 回调函数;1
2
3
4
5
6
7
8
9
10
11
12
13
14
15
16
17
18
19
20
21
22
23
24new Promise((resolve, reject) => { //传入一个函数作为参数
setTimeout(() => { //等待指定时间后执行代码
// 成功的时候调用resolve,resolve本身也是函数,跳转到then中
resolve('Hello World')
// 失败的时候调用reject,也是函数
// reject('error message')
}, 1000)
}).then((data) => {
// 1.100行的处理代码
console.log(data); // Hello World
}).catch((err) => {
console.log(err); // error message
})
new Promise((resolve, reject) => {
setTimeout(() => {
resolve('Hello Vuejs')
// reject('error message')
}, 1000)
}).then(data => {
console.log(data);
}, err => {
console.log(err);
})
链式处理
- sync 同步
- async 异步
- pending 等待状态,比如正在进行网络请求或者定时器没有到时间
- fulfill 满足状态,主动回调resolve是就处于该状态会回调then
- reject 拒绝状态,主动回调reject是就处于该状态会回调catch
1
2
3
4
5
6
7
8
9
10
11
12
13
14
15
16
17
18
19
20
21
22
23
24
25
26
27
28
29
30
31
32
33
34
35
36
37
38
39
40
41
42
43
44
45
46
47
48
49
50
51
52
53
54
55
56
57
58
59
60
61
62
63
64
65
66
67
68
69
70
71
72
73
74
75// 参数 -> 函数(resolve, reject)
// resolve, reject本身它们又是函数
// 链式编程
new Promise((resolve, reject) => {
setTimeout(() => {
resolve('aaa')
}, 1000)
}).then(res => {
// 1.自己处理10行代码
console.log(res, '第一层的10行处理代码');
// 2.对结果进行第一次处理
return new Promise((resolve, reject) => {
resolve(res + '111')
// reject('err')
})
}).then(res => {
console.log(res, '第二层的10行处理代码');
return new Promise(resolve => {
resolve(res + '222')
})
}).then(res => {
console.log(res, '第三层的10行处理代码');
}).catch(err => { // 捕获某一层抛出/发生的异常
console.log(err);
})
// new Promise(resolve => resolve(结果))简写
new Promise((resolve, reject) => {
setTimeout(() => {
resolve('aaa')
}, 1000)
}).then(res => {
// 1.自己处理10行代码
console.log(res, '第一层的10行处理代码');
// 2.对结果进行第一次处理
return Promise.resolve(res + '111')
}).then(res => {
console.log(res, '第二层的10行处理代码');
return Promise.resolve(res + '222')
}).then(res => {
console.log(res, '第三层的10行处理代码');
})
// 省略掉Promise.resolve
new Promise((resolve, reject) => {
setTimeout(() => {
resolve('aaa')
}, 1000)
}).then(res => {
// 1.自己处理10行代码
console.log(res, '第一层的10行处理代码');
// 2.对结果进行第一次处理
return res + '111'
}).then(res => {
console.log(res, '第二层的10行处理代码');
return res + '222'
}).then(res => {
console.log(res, '第三层的10行处理代码');
})
new Promise((resolve, reject) => {
setTimeout(() => {
resolve('aaa')
}, 1000)
}).then(res => {
// 1.自己处理10行代码
console.log(res, '第一层的10行处理代码');
// 2.对结果进行第一次处理
// return Promise.reject('error message')
throw 'error message'
}).then(res => {
console.log(res, '第二层的10行处理代码');
return Promise.resolve(res + '222')
}).then(res => {
console.log(res, '第三层的10行处理代码');
}).catch(err => {
console.log(err);
})
Promise的all方法
可以同时发送多个异步请求,有些需求需要所有请求都成功才可以进行,all可以判断请求是否都
成功
1 | Promise.all([ |
Vuex
Vuex 是一个专为 Vue.js 应用程序开发的状态管理模式
- Vuex 采用集中式存储管理应用的所有组件的状态,并以相应的规则保证状
态以一种可预测的方式发生变化 - Vuex 也集成到 Vue 的官方调试工具 devtools extension,提供了诸如
零配置的time-travel 调试、状态快照导入导出等高级调试功能
状态管理
简单理解:把需要多个组件共享的变量全部存储在一个对象里面,然后将这个
对象放在顶层的 Vue 实例中,让其他组件可以使用,共享这个对象中的所有
变量属性,并且是响应式的
管理的内容
- 比如用户的登录状态、用户名称、头像、地理位置信息等等。
- 比如商品的收藏、购物车中的物品等等。
- 这些状态信息,我们都可以放在统一的地方,对它进行保存和管理,而且它
们还是响应式的
单界面的管理
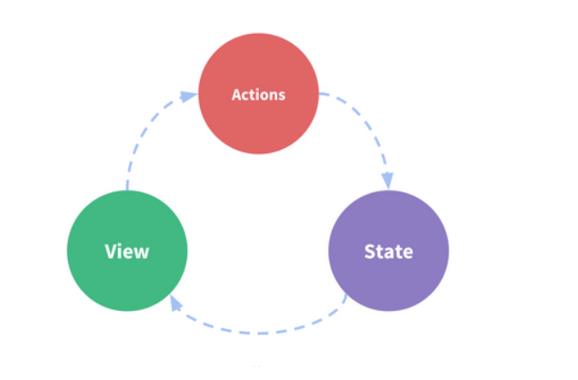
一个很简单的例子就是当前计数。counter就是state中的数据,展示在界面就
是view,自加与自减就是更新counter的行为
- state,驱动应用的数据源
- view,以声明方式将 state 映射到视图
- actions,响应在 view 上的用户输入导致的状态变化
多页面状态管理
如果多个界面使用同一个状态,并且都有权限修改并展示状态更新的话就可以
使用Vuex。 安装vuex的命令: npm install vuex –save
创建src/store文件夹,创建index.js文件 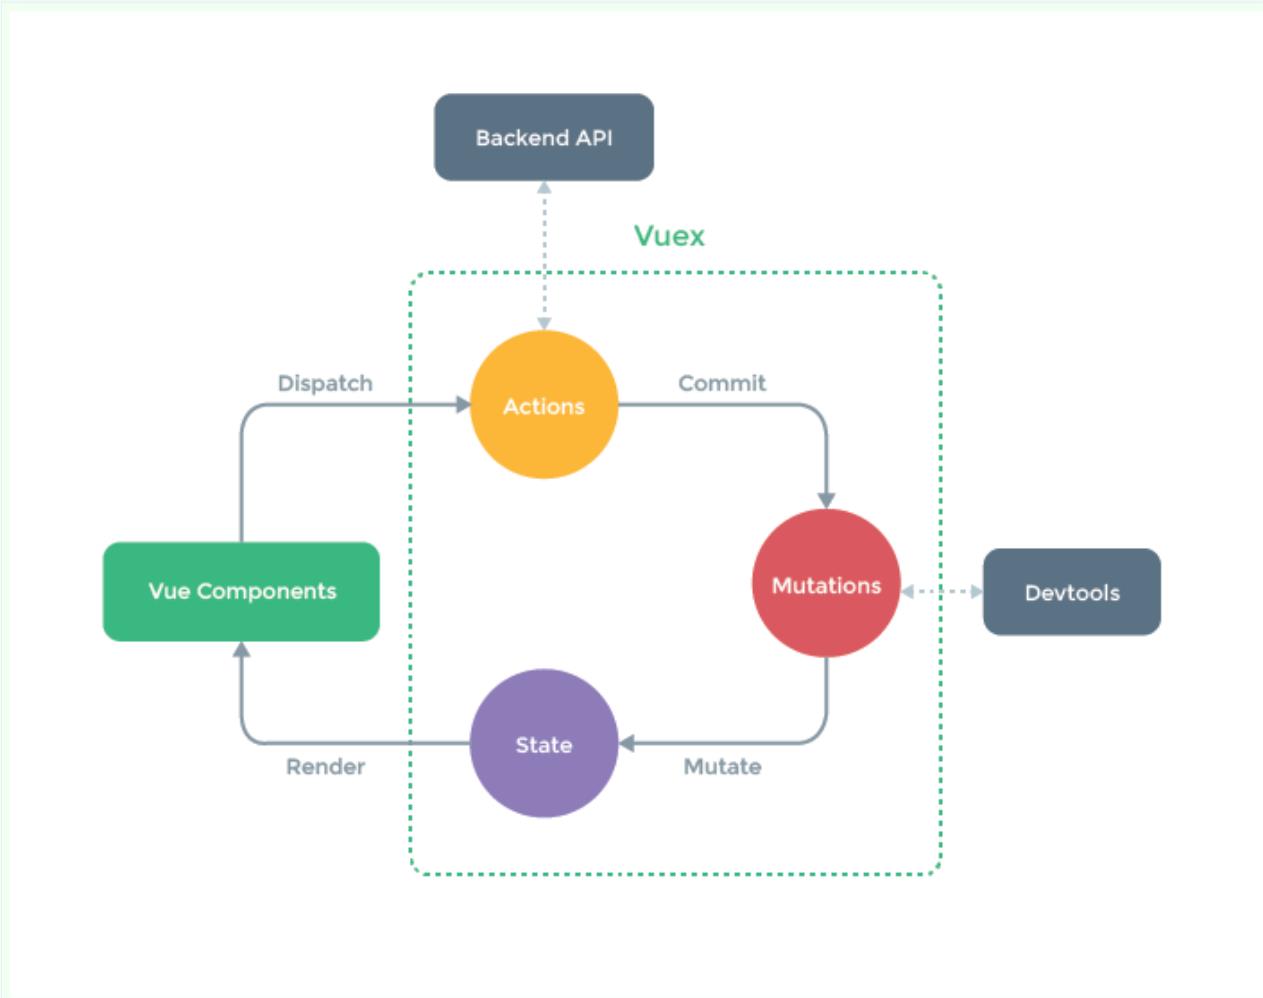
1 | import Vue from 'vue' |
在main.js中引用该文件,所有组件都可以使用store
- 可以通过$store.state.属性 来访问状态
- 通过$store.commit(‘mutation中方法’)来修改状态
1
2
3
4
5
6
7
8
9
10
11import Vue from 'vue'
import App from './App.vue'
import router from './router'
import store from './store/index.js'
Vue.config.productionTip = false
new Vue({
router,
render: h => h(App),
store
// Vue.prototype.$store=store
}).$mount('#app')
State单一状态树
如果状态信息是保存到多个Store 对象中的,那么之后的管理和维护等等
都会变得特别困难,所以 Vuex 使用了单一状态树来管理应用层级的全部
状态单一状态树能够让我们以最直接的方式找到某个状态的片段,而且在
之后的维护和调试过程中,也可以非常方便的管理和维护
getters
有时候,我们需要从store中获取一些state变异后的状态,比如下面
$store.getters.powercounter
1 | const store=new Vuex.Store( |
getters默认是不能传递参数,如果希望传递参数,只能让getters本身返回
另一个函数
1 | getters: { |
Mutation状态更新
更改Vuex的store中的状态的唯一方法是提交 mutation,Vuex 中的
mutation 非常类似于事件:每个 mutation 都有一个字符串的事件
类型 (type) 和一个回调函数 (handler);这个回调函数就是我们实
际进行状态更改的地方,并且它会接受 state 作为第一个参数
1 | mutations: { |
vuex数据的响应原理
- Vuex的store中的state是响应式的,当state中的数据发生改变时,Vue
组件会自动更新 - 最好提前在你的 store 中初始化好所有所需属性
- 当需要在对象上添加新属性时,你应该使用Vue.set(obj,’newProp’,123)
或者以新对象替换老对象。例如利用对象展开运算符我们可以这样写:1
2
3
4
5
6
7
8updateInfo(state, payload) {
// state.info['height'] = payload.height
// 方式一:Vue.set()
Vue.set(state.info, 'height', payload.height)
// 方式二:给 info 赋值一个新的对象
state.info = {...state.info, 'height': payload.height }
Vue.delete(state.info,'age')
}
Mutation常量类型
1 | export const INCREMENT = 'increment' |
vuex-actions
- Action 类似于Mutation, 但是是用来代替Mutation进行异步操作
- Action 提交的是 mutation,而不是直接变更状态
- Action 函数接受一个与 store 实例具有相同方法和属性的 context 对
象,因此你可以调用 context.commit 提交一个 mutation,或者通过
context.state 和 context.getters 来获取 state 和 getters1
2
3
4
5
6
7
8
9
10
11
12
13
14
15
16
17
18
19
20
21
22
23
24
25
26
27
28
29
30
31
32
33
34
35
36
37
38
39
40actions: {
increment(context) {
context.commit('increment')
}
}
//调用actions方法需要使用dispatch
this.$store.dispatch('increment')
// Actions.js
aUpdateInfo(context, payload) {
setTimeout(() => {
context.commit('updateInfo')
console.log(payload.message);
payload.success()
}, 1000)
},
aUpdateInfo(context, payload) {
return new Promise((resolve, reject) => {
setTimeout(() => {
context.commit('updateInfo');
console.log(payload);
resolve('1111111')
}, 1000)
})
}
methods:{
updateInfo() {
this.$store.dispatch('aUpdateInfo', {
message: '我是携带的信息',
success: () => {
console.log('里面已经完成了');
}
})
this.$store
.dispatch('aUpdateInfo', '我是携带的信息')
.then(res => {
console.log('里面完成了提交');
console.log(res);
})
}
}
Module
Module是模块的意思,Vue使用单一状态树,也就意味着很多状态都交给
Vuex管理,如果这个应用变得非常复杂,store对象就会变得非常臃肿,
Vuex允许将store分割成模块,每个模块都有自己的state mutations等
1 | const moduleA={ |
