1
参考
B站楠哥教你学java
前后端分离简介
- 就是将一个应用的前端代码和后端代码分开写
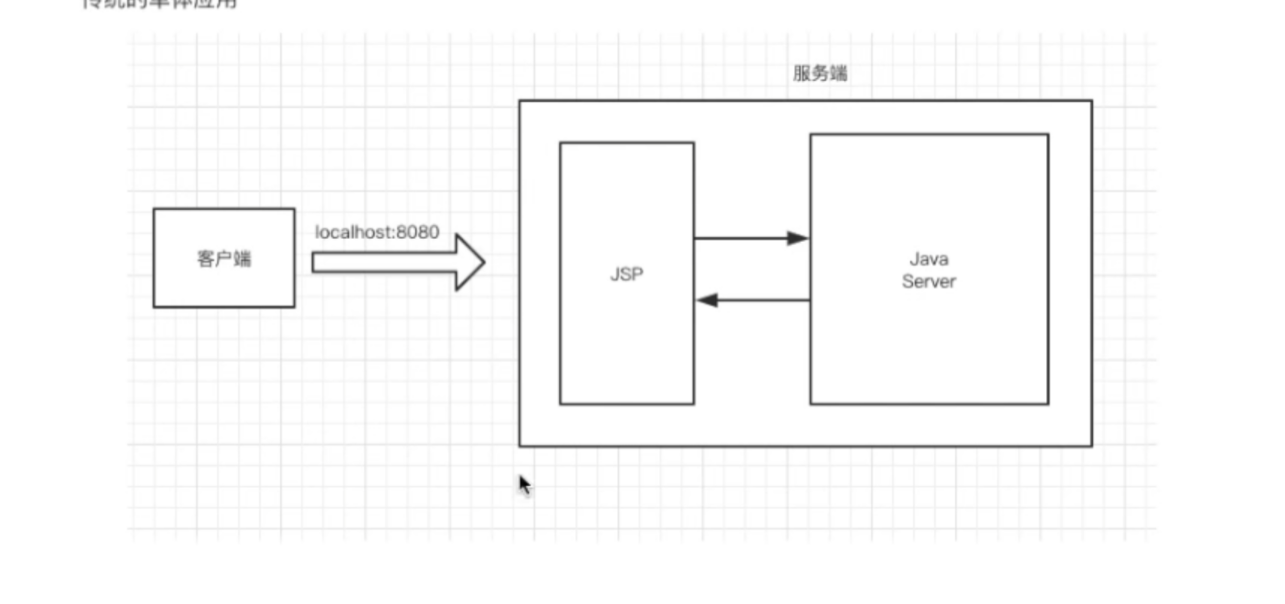
- 传统的Javaweb开发中,前端使用JSP开发,JSP不是由后端开发者独立完成的
- 前端写HTML静态页面,后端将HTML整合到JSP,这种方式效率极低
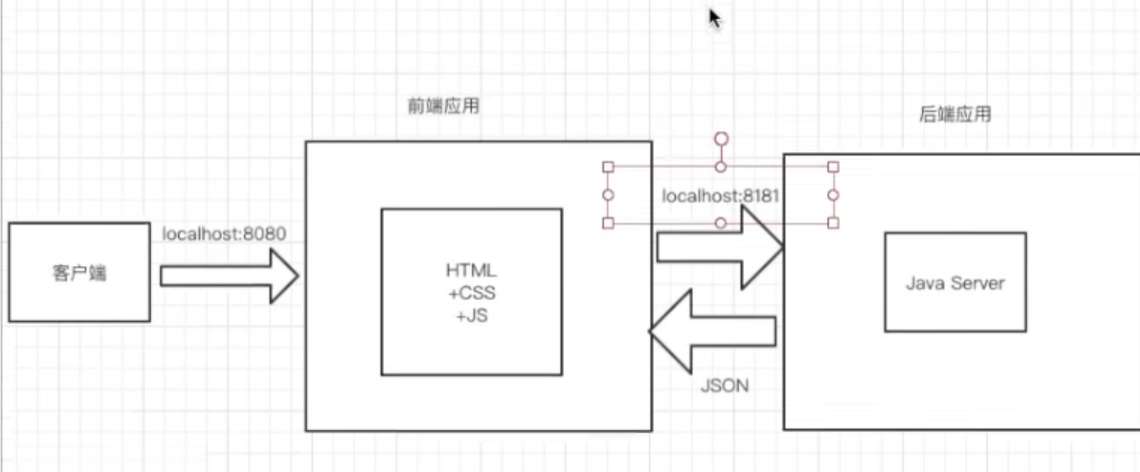
- 前后端分离的方式前端独立编写客户端代码,后端独立编写服务端代码提供数据接口
- 前端通过Ajax请求来访问后端的数据接口,将Model展示到View
- 前后端开发者只需要提前约定好接口文档(URL,参数,数据类型…),然后独立开发
- 前端可以造假数据进行测试,不需要依赖后端,最后完成前后端集成即可,实现前后端解耦合
- 前端应用负责数据展示和用户交互
- 后端应用负责提供数据处理接口
- 前端HTML通过Ajax调用基于RESTful后端数据接口
- 单体应用

- 单体应用拆成两个独立的应用,以json格式进行数据交换

- Springboot+Vue 开发最快效率最高
- Springboot进行后端开发
- Vue进行前端开发
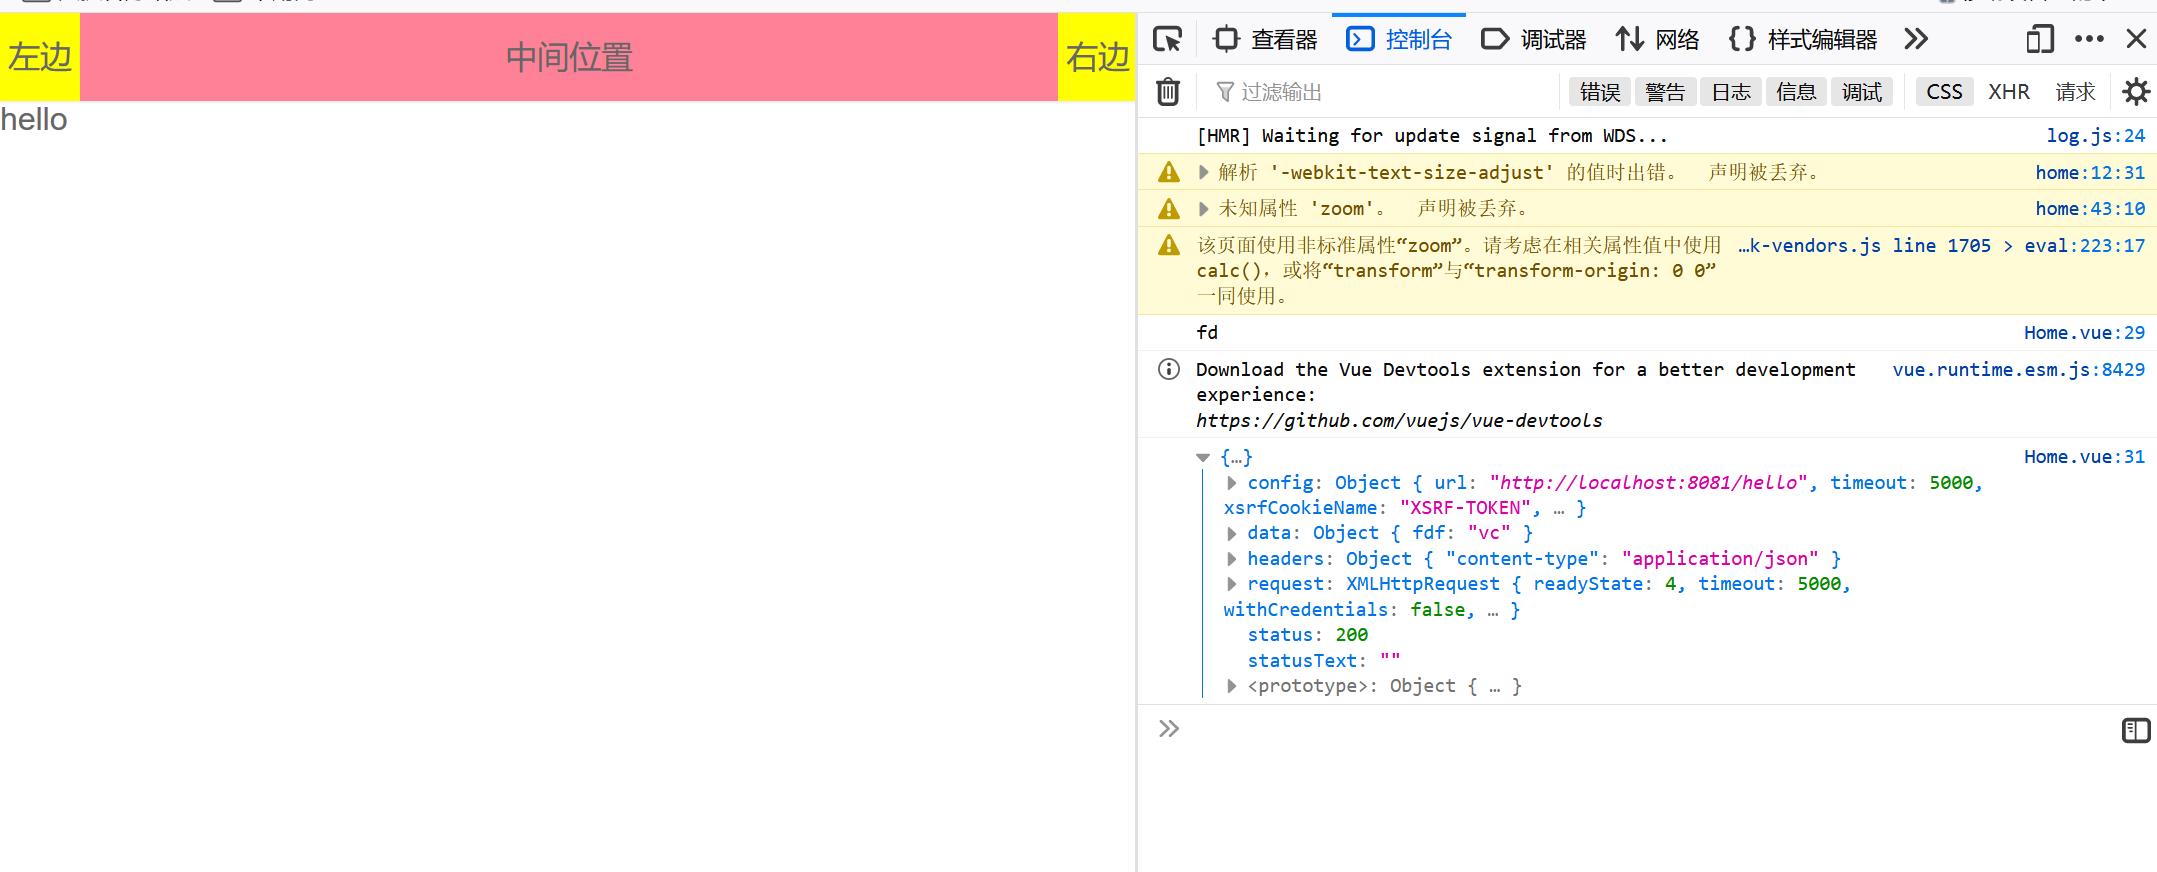
- 第一次测试前后端分离后端成功传送数据给前端

- 在Springboot中创建config文件夹创建CrosConfig类解决跨域问题,如果跨域
问题还没有解决可以参考VBlog中关于跨域的解决方法1
2
3
4
5
6
7
8
9
10
11
12
13
14
15
16package com.atguigu.config;
import org.springframework.context.annotation.Configuration;
import org.springframework.web.servlet.config.annotation.CorsRegistry;
import org.springframework.web.servlet.config.annotation.WebMvcConfigurer;
public class CrosConfig implements WebMvcConfigurer {
public void addCorsMappings(CorsRegistry registry) {
registry.addMapping("/**")
.allowedOrigins("*")
.allowedMethods("GET","HEAD","POST","PUT","DELETE","OPTIONS")
.allowCredentials(true)
.maxAge(3600)
.allowedHeaders("*");
}
}
前后端分离架构概述
核心思想是前端的HTML页面通过AJAX调用后端的RESTFUL API接口并使用JSON数
据进行交互
Swagger
Swagger可以快速生成一个接口文档网站,接口一旦发生变化,文档就会自动更新
前后端交互
@RequestBody
参考 https://blog.csdn.net/justry_deng/article/details/80972817
该注解主要用于接收前端传递给后端的json字符串中的数据,GET方式无请求体,
所以使用@RequestBody接收数据时,前端不能使用GET方式提交数据,而是用
POST方式进行提交
- 在后端的同一个接收方法里,@RequestBody与@RequestParam()可以同时
使用,@RequestBody最多只能有一个,而@RequestParam()可以有多个 - RequestBody接收的是请求体里面的数据而RequestParam接收的是
key-value里面的参数 - 如果后端参数是一个对象,并且该参数是以@RequestBody修饰的,那么前
端传递json参数时必须满足以下要求
- 后端@RequestBody注解对应的类在将HTTP的输入流(含请求体)装配到目标
类(即:@RequestBody后面的类)时,会根据json字符串中的key来匹配对应
实体类的属性,如果匹配一致且json中的该key对应的值符合(或可转换为) - json字符串中,如果value为””的话,后端对应属性如果是String类型的,
那么接受到的就是””,如果是后端属性的类型是Integer、Double等类型,
那么接收到的就是null - json字符串中,如果value为null的话,后端对应收到的就是null
- 如果某个参数没有value的话,在传json字符串给后端时,要么干脆就不把
该字段写到json字符串中;要么写value时,必须有值,null或””都行1
2
3
4
5{
stature:, //最好不要为空
age: null,
name: ''
}
JsonProperty
一般来说json字符串中的key应该与类中的属性名一样,如果不一样可以使用
注解,将json中特定的key能转换为指定的模型属性
1 | //前端传来的是userid对应id |
@RequestParam
参考 https://blog.csdn.net/sswqzx/article/details/84195043
将请求参数绑定到你控制器的方法参数上,@RequestParam(value=”参数名”,
required=”true/false”,defaultValue=””)
- value 参数名
- required 是否包含该参数,默认为true,表示该请求路径中必须包含该参数
,如果不包含就报错 - defaultValue 默认参数值,如果设置了该值,required=true将失效,自动
为false,如果没有传该参数,就使用默认值
1 | /** |
Ajax
Ajax是一种无需重新加载整个页面的情况下,能够更新部分网页的技术,
实际上就是异步js和xml的组装。通过在后台与服务器进行少量数据交换
,可以使网页实现异步更新,例如网页局部内容进行刷新,例如搜索框
和视频点赞
js实现
所有现代浏览器都支持XMLHttpRequest对象,该对象用于在后台与服务器交换
数据,可以在不重新加载整个页面的情况下对页面部分更新
1 | variable=new XMLHttpRequest(); |
Get与Post
大部分时候Get请求比较简单,以下三种情况使用Post
- 无法使用缓存文件(更新服务器上的文件和数据库)
- 向服务器发送大量数据(Post没有数据量限制)
- 发送包含未知字符的用户输入时,Post更稳定可靠
- open(method,url,true) 与服务器建立连接
- send(string) string仅限于post请求
1 | //给url加一个唯一的ID可以避免缓存 |
- setRequestHeader(header,value) 只有post使用
- 如果请求包含文件上传 setRequestHeader(“Content-Type”,”multipart/form-data”)
- 如果请求不包含文件上传 setRequestHeader(“Content-Type”,
“application/x-www-form-urlencoded”)
服务器响应
如果需要获得服务器的响应,可以使用XMLHttpRequest对象的responseText
和responseXML属性
- responseText 响应格式为string
- responseXML 响应格式为XML
responseText
如果来自服务器的响应并非XML,则使用responseText属性,该属性返回
字符串格式的响应
1 | document.getElementById("myDiv").innerHTML=xmlhttp.responseText; |
responseXML
如果服务器响应的是XML,而且需要作为XML对象进行解析
1 | xmlDoc=xmlhttp.responseXML; |
XMLHttpRequest常见属性
- readystate:请求状态
- 0 请求没有初始化
- 1 开始发送请求,已经执行了open方法并完成相关资源的准备
- 2 请求已接收
- 3 请求处理中
- 4 读取完毕
- status
- 200 服务器正常响应
- 400 无法找到请求资源
- 403 没有访问权限
- 404 资源不存在
- 500 服务器内部错误
- onreadystatechange 回调函数,就是执行完请求后接收响应的返回值
1
2
3
4
5
6
7xmlhttp.onreadystatechange=function()
{
if (xmlhttp.readyState==4 && xmlhttp.status==200)
{
document.getElementById("myDiv").innerHTML=xmlhttp.responseText;
}
}
使用Callback函数
callback函数是一种以参数的形式传递给另一个函数的函数,如果你的网站
上存在多个AJAX任务,那么应该为XMLHttpRequest 对象编写一个标准的
函数,并为每个AJAX任务调用该函数
1 | function myFunction() |
jQery
jQery是一个JavaScript库,极大简化了JavaScript编程。jQuery提供多
个与AJAX有关的方法。通过 jQuery AJAX 方法,您能够使用 HTTP Get
和 HTTP Post 从远程服务器上请求文本、HTML、XML 或 JSON,同时您
能够把这些外部数据直接载入网页的被选元素中
1 | var $value=$(key).val(); //适用于get和post |
GET
$.get(url,callback); 必须的URL参数规定需要请求的URL,可选的callback
参数是请求成功后可执行的函数名
1 | $("button").click(function(){ |
POST
$.post(URL,data,callback); 必需的URL参数规定您希望请求的URL,
可选的data参数规定连同请求发送的数据,可选的 callback 参数是
请求成功后所执行的函数名
1 | $("button").click(function(){ |
Ajax处理json对象
通过eval函数将result转变为js可以识别的json对象
axios
Vue中发送网络请求有非常多的方式,Axios是一个基于Promise的HTTP库,
可以用在浏览器和node.js中,npm install axios –save 安装axios框架
- 传统的Ajax是基于XMLHttpRequest,配置和调用混乱很少使用
- JQuery-Ajax,vue开发不需要使用jQuery
- Vue-resource不再使用
- axios
axios的特性
- 从浏览器中创建 XMLHttpRequests
- 从 node.js 创建 http 请求
- 支持 Promise API
- 拦截请求和响应
- 转换请求数据和响应数据
- 取消请求
- 自动转换 JSON 数据
- 客户端支持防御 XSRF
axios请求方式
- axios(config) 默认是get
- axios.request(config)
- axios.get(url[,config])
- axios.delete(url[,config])
- axios.head(url[,config])
- axios.post(url,[,data[,config]])
- axios.put(url[,data[,config]])
- axios.patch(url[,data[,config]])
GET请求
普通的GET请求
1 | <div id="app"> |
也可以传递参数
1 | axios |
1 | // 为给定 ID 的 user 创建请求 |
POST请求
1 | axios.post('/user', { |

axios处理并发请求
1 | function getUserAccount() { |
axios API
可以通过向axios传递相关配置来创建请求
1 | // 发送 POST 请求 |
全局配置
开发过程中很多参数都是固定的,可以抽取一些进行全局配置
1 | axios.defaults.baseURL=.. |
axios的实例和模块封装
有多个请求接口时不能使用全局,创建对应的实例
1 | const instance=axios.create({ |
将axios相关的代码放在一个文件中,不要要组件中直接使用第三方框架,在src中新建一个文件
夹network创建request.js文件
1 | import axios from 'axios' |
在需要使用的地方
1 | import {request} from "./network/request" |
还有一种更好的写法
1 | request({ |
最好的写法
1 | export function request(config){ |
axios的拦截器的使用
发送网络请求之前可能对某些请求进行拦截,对请求进行相应的处理
- 请求发送成功
- 请求发送失败
- 响应成功
- 响应失败
1
2
3
4
5
6
7
8
9
10
11
12
13
14
15axios.interceptors //全局拦截
instance.interceptors.request.use(config=>{
//拦截成功
//修改config中的一些信息
return config
},err=>{
//请求发送失败,一般不会出现这种情况
})
instance.interceptors.response.use(res=>{
..
return res.data //必须返回否则erquest接收不到响应数据
},err=>{
})
return instance(config)
跨域
当一个请求url的协议、域名、端口三者任意一个与当前页面url不同即为跨域
https://blog.csdn.net/qq_38128179/article/details/84956552
